- Joined
- 11 Oct 2012
- Local time
- 2:37 AM
- Messages
- 18,435
- Location
- SE Australia
- Website
- www.satnavsaysstraighton.com
My original plan had been to run this as a 'Bake-a-long', but I have run into a timeline problem. I don't have enough of it before going on holiday to actually arrange with everyone a date to start on, say roughly 2 weeks from now when everyone has their ingredients and jars together and is ready to run... and then enough days to get a starter going (usually 2 weeks). So I've had to take a different approach. I've set mine going already. I started it yesterday and I thought that people could start their sourdough starter when they are ready and we'll have a thread for each day's progress where pictures and questions can be asked as they happen. Once I have my starter up and running, I'll make a loaf or two, or even a pizza base and everyone can do similar when they are ready.
Read through this first. It sounds complicated and it's not. Most of what is written below explains why not tap water, why organic flour and how to sterilize your jar and teaspoons before you get going. Once you've done that, had a cuppa whilst things are sterilizing and are ready, well it's less than 5 minutes to get going and then maybe a minute or two each day, longer if you stop to take photos whistle: ).
Sterilization and clean equipment is very important. If your starter smells or tastes bad, look black, has black spots or mold spots, the major culprit will be bad bacteria through contamination. So start clean and it will be easy.
So...Sourdough Starter: Day 0
I make life easier for myself and premix my flour. I have a larger 1kg size flour jar with my 50:50 ratio of flour already mixed thoroughly. It means I only have 1 jar to open each day and I don't have to worry about keeping my ratio of flour equal. Just clean and sterilize your jar and a mixing bowl before adding your flour.

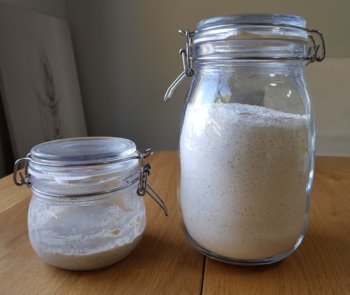
This is a 1kg flour container alongside my ¼kg size sourdough starter jar
I also use unfiltered rain water but I know it's good quality with few contaminants because if where I live. Sources I've read have suggested that filtered tap water is OK. I've not tried this but unless your cartridge specifically states that it removes chloride and fluoride from your tap water, I'd suggest you purchase some cheap mineral or spring water. Don't get fizzy water because the CO2 used to make it fizzy acidifies the water and this will affect the yeast and good bacteria in the flour water mix and will stop you getting your starter going. I'll quickly cover the reasons for not using mains tap water again. All tap water contains chloride and a lot of it contains fluoride as well. Both chlorine and fluorine are disinfectants, so they are going to kill any yeast or bacteria (good or bad, they can't tell) and you'll not get a starter going. Just think about a swimming pool (chlorine used to keep the water sanitary to swim in) and domestic bleach (hydrogen chloride) used to...
Now why organic? Short and simple, we want any residual yeasts or good bacteria that live on grains naturally. That and what in the air around us, is what we are aiming to use. Non-organic is treated with more pesticides than organic (organic can still be treated with pesticides but the list of what can be used on them is significantly shorter) and if there are any residual pesticides left in the flour, it's not going to help our starter. Finally because 1ml of pure water weights exactly 1g, I just weigh out the water. It means you don't have to sterilize a measuring jar each and everyday.
Ingredients
25g Organic rye flour
25g Organic wholemeal flour or atta flour
50g/50ml Spring or mineral water
Equipment
Ideally 2 identical small jars (250ml kilner style is great)
Stirring sticks (metal spoons are ideal because they are ready too clean)
Set of scales
Kettle
What to do on Day 0
Today is a key day for cleanliness. If your first jar isn't clean and sterile you're going to add potentially bad bacteria and bad yeast to your starter. Don't panic. It's really easy to sterilize your jar.

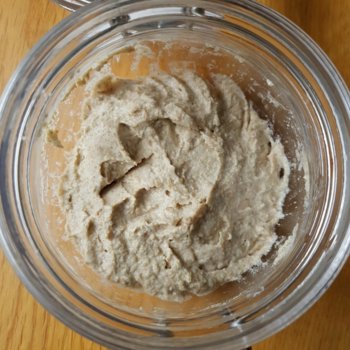
Too thick for my liking but some people keep their starter this thick.

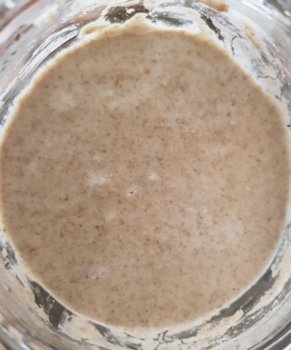
This is my preferred thickness. It doesn't affect the end product.
How warm you keep it, how wet it is, whether the lid is open or closed, your natural air environment (air con is not going to help, so I'd keep the lid closed), even the season you are in, are all going to affect how quickly your starter gets going.
But for the next couple of weeks you need to tend to it daily. After that, once it is established and more resilient, you can put it in the fridge and leave it there for years if you want to.
Read through this first. It sounds complicated and it's not. Most of what is written below explains why not tap water, why organic flour and how to sterilize your jar and teaspoons before you get going. Once you've done that, had a cuppa whilst things are sterilizing and are ready, well it's less than 5 minutes to get going and then maybe a minute or two each day, longer if you stop to take photos
 whistle: ).
Sterilization and clean equipment is very important. If your starter smells or tastes bad, look black, has black spots or mold spots, the major culprit will be bad bacteria through contamination. So start clean and it will be easy.
So...Sourdough Starter: Day 0
I make life easier for myself and premix my flour. I have a larger 1kg size flour jar with my 50:50 ratio of flour already mixed thoroughly. It means I only have 1 jar to open each day and I don't have to worry about keeping my ratio of flour equal. Just clean and sterilize your jar and a mixing bowl before adding your flour.

This is a 1kg flour container alongside my ¼kg size sourdough starter jar
I also use unfiltered rain water but I know it's good quality with few contaminants because if where I live. Sources I've read have suggested that filtered tap water is OK. I've not tried this but unless your cartridge specifically states that it removes chloride and fluoride from your tap water, I'd suggest you purchase some cheap mineral or spring water. Don't get fizzy water because the CO2 used to make it fizzy acidifies the water and this will affect the yeast and good bacteria in the flour water mix and will stop you getting your starter going. I'll quickly cover the reasons for not using mains tap water again. All tap water contains chloride and a lot of it contains fluoride as well. Both chlorine and fluorine are disinfectants, so they are going to kill any yeast or bacteria (good or bad, they can't tell) and you'll not get a starter going. Just think about a swimming pool (chlorine used to keep the water sanitary to swim in) and domestic bleach (hydrogen chloride) used to...
Now why organic? Short and simple, we want any residual yeasts or good bacteria that live on grains naturally. That and what in the air around us, is what we are aiming to use. Non-organic is treated with more pesticides than organic (organic can still be treated with pesticides but the list of what can be used on them is significantly shorter) and if there are any residual pesticides left in the flour, it's not going to help our starter. Finally because 1ml of pure water weights exactly 1g, I just weigh out the water. It means you don't have to sterilize a measuring jar each and everyday.
Ingredients
25g Organic rye flour
25g Organic wholemeal flour or atta flour
50g/50ml Spring or mineral water
Equipment
Ideally 2 identical small jars (250ml kilner style is great)
Stirring sticks (metal spoons are ideal because they are ready too clean)
Set of scales
Kettle
What to do on Day 0
Today is a key day for cleanliness. If your first jar isn't clean and sterile you're going to add potentially bad bacteria and bad yeast to your starter. Don't panic. It's really easy to sterilize your jar.
- Wash your jar and rinse well (if it's already clean I would recommend you stand it in some warm water, I have had glass jars break in the past when I've filled them with boiling water, prewarming them reduces the risk).
- Now remove the rubber seal and put it inside the jar so it also gets sterilized in the next step. Now stand this on the draining board, ideally cleaned or not touching it.
- Boil the kettle, 1/2L is plenty unless you're making a cuppa at the same time, and fill the jar with boiling water. Fill it as full as you can get it. If you're on the draining board, overfill it and rinse the lid as well. Oh and add in a couple of teaspoons as well. You'll need them sterile too.
- Leave for 5-10 minutes (long enough to drink that cuppa).
- Now drain the jar, just shake it dry. Carefully put the rubber seal back on handling as little as possible. Air dry the teaspoons and keep them clean. Inside the jar is a useful place to put them!
- Finally, the easy bit. Weigh the flour directly into the jar (50g total), spoons removed for using... (there'd a spare one just in case you're wondering. I know what I'll like.) Now weigh out the water directly into the jar with the flour... stir well.
- Find a warm home for it. Closing the lid is entirely up to you. I do. But I open it several times a day to change the air so to speak. Afterall it is the yeast and good bacteria in the air that we are after, so it makes sense to expose it to fresh(er) air a few times a day initially.

Too thick for my liking but some people keep their starter this thick.

This is my preferred thickness. It doesn't affect the end product.
How warm you keep it, how wet it is, whether the lid is open or closed, your natural air environment (air con is not going to help, so I'd keep the lid closed), even the season you are in, are all going to affect how quickly your starter gets going.
But for the next couple of weeks you need to tend to it daily. After that, once it is established and more resilient, you can put it in the fridge and leave it there for years if you want to.
